PouchDB: An Introductory Tutorial
PouchDB is an easy to use JavaScript database that is perfect for the web and mobile devices because of its inherent syncing abilities. In this tutorial, you will learn the fundamental concepts behind PouchDB, how to use the most common features and put it all together into a working Notes web app that runs in the browser as well as on a Node.js server.
PouchDB Overview
PouchDB is a JavaScript implementation of CouchDB, which is a document-based NoSQL database, rather than a traditional table-based relational database. Instead of having a rigidly defined schema, you can add as much information as you want to each document individually. This makes it very flexible and easy to use.
Different database types each have their pros and cons. The distinguishing feature of a CouchDB database is its fundamental syncing and replication system. If you have ever tried doing this manually, you know it can be an absolute nightmare, but with CouchDB, it's simple by design.
This system allows you to develop 'offline-first' apps, i.e. designing the app to never need a constant connection to the server. Instead of directly communicating to the server, you operate on a local database that syncs to the server. This way, if the connection is lost for any reason, the app still functions. Once the connection comes back, all the changes in the database sync to the server and vice versa. This works especially well with mobile devices that can easily lose their network connection.
Backend Storage Adapters
PouchDB, oddly enough, actually uses other databases to store the data on disk. This makes perfect sense when you consider how it runs in the browser. It has to use either WebSQL or IndexedDB to store data persistently, as there is no file system access. It uses adapters to handle the serialization of data to these different backends. There are several adapters for use with different backend systems as you can see on the official documentation.
By default, a database created in a Node environment uses a LevelDB backend, while a database created in the browser uses an IndexedDB backend. Through the use of PouchDB plugins, you can also use WebSQL for older browsers or an in-memory adapter for non-persistent data.
What is a Document?
The atomic level element of a PouchDB database is the document. They can store any data that is serializable as JSON. Binary data can be stored as an attachment to a document, though we won't be getting in to that in this tutorial.
Every document has _id and _rev fields. The _id is a unique string that you use to access the document. The _rev is the current revision of the document. Every time you update the document, the _rev tag gets incremented automatically. This is how the database can sync and keep track of changes so easily.
The _id has some special properties. Beyond just being a way to access the document, it also acts as the natural ordering if you enumerate through all the documents. You can use this fact to your advantage if you are clever with your _id strings. We'll talk more about that in the Best Practices section.
Special Documents
There are two types of special documents: local and design documents. A local document has an _id that begins with the string "_local/". These don't sync to other databases, don't appear when you call allDocs() and don't appear in the changes feed, both of which we will talk about shortly. This is an easy way to store local user preferences and settings.
A design document has an _id that begins with the string "_design/". Design documents are created by certain functions in the database like creating an index or a view. Unlike local documents, these act just like normal documents, so you have to take care to filter them out in certain situations. The example app we are going to create will show how to do this.
Plugins
PouchDB has a built-in plugin system to add a lot more functionality. The backend adapters we previously discussed are implemented as plugins. As you can see from this list of known plugins, you can add authentication systems, integration with different application frameworks, lots of convenience functions and much more.
Once you learn the basics, definitely take the time to see what all the plugins do, as it may give you ideas of how to structure your application or your data in ways you wouldn't otherwise consider.
PouchDB Common Features
Now that you have an idea of what PouchDB is, let's look at how easy it is to use. The API is remarkably simple, with only a handful of functions you need to learn. The difficult part can be structuring your data in such ways to get the best performance, especially on slower mobile devices.
PouchDB is an asynchronous API. Every function supports using callbacks, promises or async/await. I will be showing the async/await form, but you can see all the versions, as well as the full details of each function, on the official API reference.
Creating / Opening a Database
Since there is no schema involved, creating a database is as simple as giving it a name. The process is slightly different if you are running in a Node environment vs a browser environment.
All of these methods either open an existing database or create a new one if it doesn't exist. Once the database is opened, there are no API differences between the Node and browser versions, but you should consider performance and storage limits when running in a browser.
Browser
In the most simple form, you simply load PouchDB and any plugins you want, then instantiate a new PouchDB instance to create or open the database. In the example app, I will show how you can choose which backend database to use depending on which browser you are running.
var PouchDB = require('pouchdb').default;
PouchDB.plugin(require('pouchdb-find').default);

var dbName = 'PouchNotesDB';
var db = new PouchDB( dbName );
Node
When running in a Node environment, the only other consideration is where to save the database files on disk. If you omit the prefix option, the files will be written to the current working directory.
const pathPrefix = 'PouchDB/';
const PouchDB = require('pouchdb').defaults({ prefix: pathPrefix });
PouchDB.plugin(require('pouchdb-find'));

var dbName = 'PouchNotesDB';
var db = new PouchDB( dbName );
Remote
You can also connect directly to a remote database by passing the URL to the constructor.
const PouchDB = require('pouchdb').defaults();
PouchDB.plugin(require('pouchdb-find'));

var url = 'http://host:5984/PouchNotesDB';
var db = new PouchDB( url );
Create a Document
put
The main way to add documents to a database is the put() function. You are required to specify an _id in the document with this method.
try {
    // _id is required
    var doc = { _id: 'mydoc',
                title: 'my docoument' };
    var response = await db.put( doc );

    // response.id has the _id of the inserted document
    // response.rev has the _rev of the inserted document
}
catch( err ) {
    console.log( err );
}
post
In the rare case that you don't want to specify an _id, the post() function will generate a random _id for the document. This method is highly discouraged because you lose a lot of the benefits you get when you control the _id.
try {
    // _id is automatically created
    var doc = { title: 'my other document' };
    var response = await db.post( doc );

    // response.id has the _id of the inserted document
    // response.rev has the _rev of the inserted document
}
catch( err ) {
    console.log( err );
}
Access Documents
get
To retrieve a single document, you pass the _id of the document to the get() function.
try {
    var id = 'mydoc';
    var doc = await db.get( id );
}
catch( err ) {
    console.log( err );
}
allDocs
To retrieve multiple documents, you can use the allDocs() function, which will retrieve all the documents in the database by default. Using the startkey and endkey options, you can specify a range of documents to retrieve.
try {
    var options = {
        include_docs: true,
        startkey: 'aaa',
        endkey: 'mmm'
    };
    var result = await db.allDocs( options );

    for( var i=0; i<result.rows.length; i++ ) {
        // result.rows[i].id is the document _id
        // result.rows[i].doc is the full document if include_docs is true
    }
}
catch( err ) {
    console.log( err );
}
Update a Document
In order to update a document, you first retrieve the document from the database to get the latest revision. Making changes to the object returned doesn't effect what is stored in the database. You have to call put() with the document to save the changes to the database.
try {
    // Retrieve the document to get the latest revision
    var id = 'mydoc';
    var doc = await db.get( id );

    // Make changes
    doc.title = 'new title';

    // Put the document, saving it as a new revision
    var response = await db.put( doc );

    // response.id has the _id of the document
    // response.rev has the new _rev of the document
}
catch( err ) {
    console.log( err );
}
Delete a Document
Deleting a document is much like updating a document in that you have to get() the document with the latest revision, then you call remove() to delete the document.
try {
    var id = 'mydoc';
    var doc = await db.get( id );
    var response = await db.remove( doc );
}
catch( err ) {
    console.log( err );
}
Changes Feed
PouchDB has a mechanism for emitting events when the database changes in any way. You can use this to update the UI or perform application logic when the data changes. This is particularly useful when syncing databases that can both be modified, like a client-server messaging system.
You can specify to get all changes from a specific time in the past as a one-time operation, or to get continual change events going forward in time by using the "since" and "live" options.
var options = {
        since: 'now',
        live: true,
        include_docs: true
    };

db.changes( options )
.on('change', (change) => {
    console.log( change );
})
.on('error', (err) => {
    console.log( `Change Error: ${err}` );
});
Searching
You search a database by creating an index for the fields you need to search. This is the expensive operation. Once you create the index, you can efficiently query it using the find() function.
You are allowed to create a query that uses fields you haven't indexed, though you lose the performance benefit of having an index. It is the same as using allDocs() and manually checking every document.
See the official documentation for the full details of the query language. There is a lot you can do with it.
try {
    // Create the Index
    var result = await db.createIndex({
        index: {
            fields: ['category']
        }
    });

    // Query the Index using find().
    result = await db.find({
        selector: {
            category: 'todo'
        }
    });

    // Found docs are in result.docs
    console.log( 'Amount Found: ' + result.docs.length );
}
catch( err ) {
    console.log(err);
}
Example Application
You can see how simple the PouchDB functions are, but now let's put this all in the context of an actual working application. We will create a simple Notes app that runs in the browser, but syncs its data to a server.
The UI will consist of an input section to create a new Note or Todo item. Below that will be a table that displays all the Notes and Todo items. It will have a filter box so the user can change between viewing all items, only the notes or only the todo items.
Installation
I use Webpack to bundle modules and Babel to transpile code for the browsers. I have a Visual Studio Code template project preconfigured with Webpack, Babel and Express. That project is designed to run both a Node / Express server and the browser app from one codebase.
Download and extract the template zip, then install all the base modules for Webpack, Babel and Express using:
$ npm install
Next, install all the PouchDB modules you need for this tutorial using:
$ npm install pouchdb pouchdb-find pouchdb-adapter-memory pouchdb-adapter-websql express-pouchdb --save
If you are using Visual Studio Code, run the "Webpack Watch" task to build the bundled code and launch the app using the "Launch Server and Client" debug configuration. If everything works, you will see a Chrome window open with the template webpage loaded.
If you aren't using Visual Studio Code, you can run Webpack using:
$ npm run webpack
And you can start the server using:
$ npm run start
Then open any web browser to http://localhost:3000/ to see the page.
Creating the User Interface
Let's create the HTML and CSS for the user interface for the client-side implementation.
client/index.html
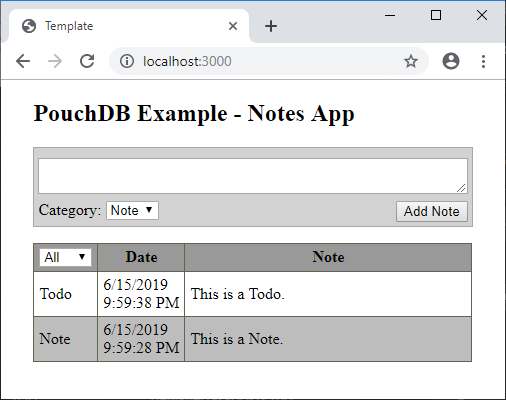
<div id='main'>
    <h2>PouchDB Example - Notes App</h2>

    <div id='noteInput'>
        <textarea id='noteTextArea'></textarea>
        Category: <select id='noteCategorySelect'>
            <option value='Note'>Note</option>
            <option value='Todo'>Todo</option>
        </select>
        <button id='addNoteBtn'>Add Note</button>
        <div style="clear:both"></div>
    </div>

    <table class='thin_table' id='noteTable'>
        <thead>
            <tr><th><select id='noteFilterSelect'>
                    <option value='All' selected>All</option>
                    <option value='Note'>Note</option>
                    <option value='Todo'>Todo</option>
                </select></th>
                <th>Date</th>
                <th>Note</th></tr>
        </thead>
        <tbody id='noteTableBody'>
        </tbody>
    </table>
</div>
client/style.scss
* {
    box-sizing: border-box;
}

body {
    background-color: white;
}

#main {
    width:90%;
    margin: auto auto;
}

#noteInput {
    background-color: lightgray;
    border: 1px solid darkgray;
    width: 100%;
    margin: 1em 0em;
    padding:0.25em;
}

#noteTextArea {
    width: 100%;
    margin:0.5em 0em;
    display: block;
}

#addNoteBtn {
    float:right;
}

.thin_table {
    width:100%;
    border-collapse: collapse;
    line-height: initial;
}
.thin_table th {
    background-color: rgba(0, 0, 0, 0.40);
}
.thin_table tr:nth-child(even) {
    background-color: rgba(0, 0, 0, 0.26);
}
.thin_table td:first-child {
    width:10%;
}
.thin_table td:nth-child(2) {
    width:20%;
}
.thin_table th, .thin_table td {
    border: 1px solid #656150;
    padding: 0.3em;
}
Creating a Database
Node
Let's first look at how we create a PouchDB instance on a Node server and serve it using Express.
server/app.js
// Configure PouchDB to:
//  - Store its files in a PouchDB subdirectory.
//  - Load the pouchdb-find plugin.
const PouchDB = require('pouchdb').defaults({ prefix: 'PouchDB/' });
PouchDB.plugin(require('pouchdb-find'));

// Create a database instance.
var dbName = 'PouchNotesDB';
var db = new PouchDB(dbName);

// Configure Express
const hostname = ''; // 127.0.0.1 for local connections only
const port = 3000;
const express = require('express');
const appExpress = express();
const http = require('http').Server(appExpress);

appExpress.use(express.static('public/'));

// Hook PouchDB into the Express App on the '/db' route.
appExpress.use('/db', require('express-pouchdb')(PouchDB, {
    configPath: 'PouchDB/config.json',
    logPath: 'PouchDB/log.txt'
}));

// Start the Server
http.listen(port, hostname, function () {
    console.log(`listening on ${hostname}:${port}`);
});
With just this little bit of code, we have a webserver running that serves from the public directory and a PouchDB server running on the /db route. This means that you can connect to the database using the url: "http://127.0.0.1:3000/db/PouchNotesDB".
In-browser
Creating the database on the client-side is complicated by having to worry about how well the backend database works on different browser versions. By default, a database created in a browser will use IndexedDB as the backend, which is fine for all recent browsers.
Unfortunately, if you have to support older versions of Safari, for instance, IndexedDB is available, but has some bad bugs. In that case you'll force the use of the WebSQL adapter. We also leave the option to create an in-memory database.
client/index.js
// Load the HTML and CSS
require ('./style.scss');
document.body.innerHTML = require('./index.html');

// Configure PouchDB
var PouchDB = require('pouchdb').default;
PouchDB.plugin(require('pouchdb-adapter-websql').default);
PouchDB.plugin(require('pouchdb-adapter-memory').default);
PouchDB.plugin(require('pouchdb-find').default);

// Creates a database using the appropriate adapter.
// Uses the 'memory' adapter if inMemory is true.
// Uses the 'websql' adapter if the browser is Safari 9 or earlier.
// Uses the default 'idb' adapter otherwise.
function createDatabase( databaseName, inMemory ) {

    if( inMemory ) {
        return new PouchDB( databaseName, {adapter: 'memory'} );
    }

    // If browser is Safari < 10, use WebSql, else use the default.
    var dontUseFaultyIndexedDB = /^Apple/.test(navigator.vendor) && /AppleWebKit[/]60.*Version[/][89][.]/.test(navigator.appVersion);

    if( dontUseFaultyIndexedDB ) {
        return new PouchDB( databaseName, {adapter: 'websql'} );
    }

    return new PouchDB( databaseName );
}

// Create the database
var dbName = 'PouchNotesDB';
var db = createDatabase(dbName);
Adding Notes
Now that we've got the database created, let's add some documents when the user clicks the "Add Note" button. This is when we have to figure out how to best use the _id. In this case, we will want the notes to be sorted by date, so it makes the most sense to put the date in the _id.
With that in mind, the _id is going to be the string 'pouchnotes_' plus the date and time of creation. Prefixing with 'pouchnotes_' in the _id lets us easily filter out the design documents when using allDocs().
Each document will have category, date and text fields. Since the documents are unique, we aren't limited to using the same fields for every document. We could easily add a priority field for Todo items, for instance.
client/index.js
//
// Add a document when the "Add Note" button is clicked.
//
document.getElementById('addNoteBtn').addEventListener('click', addNote);
async function addNote(e) {
    var noteText = document.getElementById('noteTextArea');
    var noteCategorySelect = document.getElementById('noteCategorySelect');
    var noteTableBody = document.getElementById('noteTableBody');

    try {
        // Create the document _id.
        var now = Date.now();
        var id = 'pouchnotes_' + now.toString();

        // Add the document to the database.
        var response = await db.put({
            _id: id,
            date: now.valueOf(),
            category: noteCategorySelect.value,
            text: noteText.value,
        });

        // Clear the input UI.
        noteText.value = "";

        // Get the document we added and update the UI.
        var doc = await db.get(response.id);
        addDocToTable(doc, noteTableBody);
    }
    catch( err ) {
        console.log(`Error: ${err}`);
    }
}

//
// Adds the document to the HTML table.
// If the document already exists in the table, it will be updated.
//
function addDocToTable(doc, noteTableBody) {

    // Each row of the table has an id attribute set to the doc._id field.
    var tr = noteTableBody.querySelector(`#${doc._id}`);

    if( !tr ) {
        tr = document.createElement('tr');
        tr.id = doc._id;
    }

    // Remove any existing table cells.
    while(tr.hasChildNodes()) {
        tr.removeChild(tr.childNodes[0]);
    }

    // Create new table cells for the category, date and text fields.
    var tdCat = document.createElement('td');
    tdCat.innerText = doc.category;
    tr.appendChild(tdCat);

    var tdDate = document.createElement('td');
    var date = new Date(doc.date);
    tdDate.innerText = date.toLocaleDateString() + ' ' + date.toLocaleTimeString();
    tr.appendChild(tdDate);

    var tdText = document.createElement('td');
    tdText.innerText = doc.text;
    tr.appendChild(tdText);

    // Add the row to the top of the table.
    noteTableBody.insertBefore(tr, noteTableBody.firstChild);
}
Run the app and add a few Notes and Todo items to make sure everything is working. As you add more items, it becomes clear that it would be nice to be able to show only the Notes or Todo items separately. Let's work on that next.
Filter Categories
We want to be able to filter the documents so that the user can choose to show everything or just single categories in the table. We will use allDocs() to show all categories and a search on the category field to show just the Notes or Todos.
If we used allDocs() without any options, we would have to work around the design documents or any other types of documents we would add in the future. Instead, we will have allDocs() only return the documents whose _id starts with 'pouchnotes_' by setting startkey to 'pouchnotes_' and endkey to 'pouchnotes_\ufff0'. While that looks a little strange, it works because \ufff0 is the last unicode character and the _ids are sorted alphabetically.
To display just a specific category, we will create an index on the category field, and then find the documents with the specific category.
client/index.js
//
// When the filter select box changes, either use allDocs() to
// show everything, or find() to show a specific category.
//
var noteFilterSelect = document.getElementById('noteFilterSelect');
noteFilterSelect.addEventListener('change', filterChange);
async function filterChange(e) {
    var filterStr = noteFilterSelect.value;

    var docs = [];

    try {
        // For All category:
        //  Use allDocs() to retrieve all documents whose _id
        //  starts with 'pouchnotes_'.
        //
        if( filterStr === 'All') {
            var result = await db.allDocs({
                include_docs: true,
                startkey: 'pouchnotes_',
                endkey: 'pouchnotes_\ufff0'
            });

            for(var i=0; i<result.rows.length; i++) {
                docs.push(result.rows[i].doc);
            }
        }

        // For filtering a specific category:
        //   Create an index for the category field
        //   Find the documents with the selected category
        else {
            let result = await db.createIndex({
                index: {
                    fields: ['category']
                }
            });

            result = await db.find({
                selector: {category: filterStr}
            });

            docs = result.docs;
        }
    }
    catch( err ) {
        console.log(`Error: ${err}`);
    }

    // Update the UI with the filtered documents
    updateUIWithDocs(docs);
}

//
// Clear and update the UI to display the docs.
//
function updateUIWithDocs(docs) {
    var noteTableBody = document.getElementById('noteTableBody');

    // Remove all child nodes from the table
    while(noteTableBody.hasChildNodes()) {
        noteTableBody.removeChild(noteTableBody.childNodes[0]);
    }

    // Add the new documents to the table
    for(var i=0; i<docs.length; i++) {
        var doc = docs[i];
        addDocToTable(doc, noteTableBody);
    }
}
Changes Feed
If you have been running this app, you will have noticed that it doesn't load any documents when it starts up, making it appear that the data isn't being saved. We obviously need to load the documents when the app starts. The most obvious way to do this is to use the same allDocs() call we did for filtering, but since we've already done that, let's use the changes feed instead. When we register for change events, we will request all the changes from the beginning of the database. Since we do this immediately when the application starts, we will instantly load all the documents for the UI.
The change events can often be the backbone of your application. Let's say you have a complex calculation running in the background and, once it finishes, it updates a document in the database. Your UI layer would simply be registered with the change events and update the UI when it sees the change. What's exciting here is that the calculation could be running on the local computer or on a server farm, and the code would remain exactly the same. It doesn't matter where the change comes from, the UI will update as if the whole thing is running locally.
For this example, once we enable syncing, you can load multiple web browsers or multiple machines and they will all share the same data. When you make a change on one browser, it will immediately show up on all the others.
Much like we did with allDocs(), we want to ignore the design documents. The changes feed doesn't have the same startkey and endkey options as allDocs(), instead, it uses a filter function to ignore any document whose _id starts with '_design'.
client/index.js
// Register for Change Events
//   since: 0 so that we get all the documents from the beginning of the database
//   live: true so that we get continually notified of new changes
//   include_docs: true so that the full document is included, not just the _id
//   filter: We filter out the design documents
db.changes({
    since: 0,
    live: true,
    include_docs: true,
    filter: (doc) => doc._id.indexOf('_design') !== 0
})
.on('change', dbChange)
.on('error', (err) => {
    console.log(`Change Error: ${err}`);
});

//
// Change Event Handler
//
// When a document changes, we simply add it to the HTML table.
//
// change.id contains the doc id
// change.doc contains the doc if include_docs is true
// change.deleted is true if the document was removed from the database
//
function dbChange(change) {
    if (change.deleted) {
        // document was deleted
    }
    else {
        // document was added/modified
        var noteTableBody = document.getElementById('noteTableBody');
        addDocToTable(change.doc, noteTableBody);
    }
}
Now, when you start the app, the table will be populated by the existing data. To finish this example app, let's enable syncing with the server.
Syncing the Database
There are three options when talking about syncing databases, each with their own API call.
| Function | Description |
|---|---|
| replicate.from( url, options ) | Replicate in one direction from a remote database to the local database. |
| replicate.to( url, options ) | Replicate in one direction from the local database to a remote database. |
| sync( url, options ) | Replicate in both directions. |
By default, each of these replicates the data only once. With the live option enabled, they will continuously replicate the data every time a change is made. With the retry option enabled, they will keep trying to connect if the network connection goes down.
In the browser, syncing is most commonly done by replicating the data once from the server when the app first loads. Once the replication is complete, you start the continuous bidirectional replication.
It is a best practice to not sync design documents, so, much like with the changes feed, we use the filter function to skip any document whose _id starts with '_design'.
client/index.js
//
// Do a one way, single replication from the server.
// Once it completes, start a two-way, continuous,
// retry-able sync.
//
var url = `http://${location.host}/db/${dbName}`;
db.replicate.from(url, {
    filter: (doc) => doc._id.indexOf('_design') !== 0
})
.on('complete', function(info) {
    db.sync(url, {
        live: true,
        retry: true,
        filter: (doc) => doc._id.indexOf('_design') !== 0
    });
})
.on('error', (err) => {
    console.log(`Error: ${err}`);
});
So that we can see the syncing happen, add a log statement on the server when it gets a change in its database.
server/app.js
//
// Log Changes
//
db.changes({
    since: 'now',
    live: true,
    include_docs: true
})
.on('change', (change) => {
    console.log(`${change.id} Change - ${change.doc.text}`);
})
.on('error', (err) => {
    console.log(`Change Error: ${err}`);
});
To test this is all working, start the server and open two different browsers to localhost:3000. Try adding Notes in both browsers and see them appear in the other.
That really demonstrates the basic workings of PouchDB. You can see just how little work it takes to get a functional prototype up and running. Now let's wrap up by talking a bit about some best practices as you think about developing larger applications.
Best Practices
Use IDs wisely
Each document is required to have an _id, so make it a useful piece of information whenever possible. An easy way to do this is by prefixing the _id with relevant information that groups related items.
For instance, we could have separated the note and todo items in our example app by prefixing the _id with "note_" and "todo_". Especially as your data set gets larger, this becomes a valuable optimization strategy. Instead of having to do an expensive search, you can just get a subset of keys using allDocs().
You just have to be aware of how the documents are sorted. You can find more information about the sort order of _ids on the CouchDB documentation.
Use Many Databases
It is natural to assume that you are only supposed to open one database per program, but that isn't the case in PouchDB. Opening databases is extremely cheap in this format and it is recommended to have many databases open, more or less on a per-feature basis. This way you can have very specific databases optimized for each part of your program.
This is also one way to design a multi-user application. Each user can have their own set of databases. This is highly specific to each application, and there may be instances where you need to share databases between users, but it is a good place to start when thinking about the design of a multi-user app.
Conclusion
You've seen how easy it is to get started with PouchDB. Your next steps should be to read the full API documentation and especially spend some time looking through all the plugins available that can add a lot of functionality and integration into different frameworks.
Having learned about PouchDB also lets you seamlessly transition to wider CouchDB universe. Versions exist for iOS, Android and multiple servers. See couchdb.apache.org for more information.
I hope this has been helpful. Let me know if you have any comments or questions.