Virtual 7.1 Surround Sound for Headphones
I wanted to find a way to watch a DVD or BluRay using headphones, while still having the surround sound experience, without having to buy any special equipment. I tried using the Windows built-in spatial audio solution (Windows Sonic for Headphones), but while it works for games, it doesn't work for this specific use-case.
In searching the Internet, I found HeSuVi (Headphone Surround Virtualizations), which is the perfect solution. HeSuVi takes a 7.1 audio signal and converts it to a binaural stereo signal, which maintains the spatial audio effect of the 7.1 signal when listened to on headphones. You can read more about how this works here. I was shocked by how well this effect works.
Unfortunately, the instructions on the HeSuVi website did not work for my setup. The accessory programs that are required either didn't work or would crash frequently. Luckily, I found solutions to these problems scattered around various discussions and comments.
I have put together this guide to bring all this information together in one spot. I am going to explain how each piece connects to the others as I go through this, since it is rather complex and it helps to understand what everything is doing.
This is specifically for getting virtual 7.1 surround sound using the Realtek front panel stereo audio output (the typical headphone jack of most computers). However, a lot of the information is identical if you have a dedicated sound card or a USB headset.
First Steps
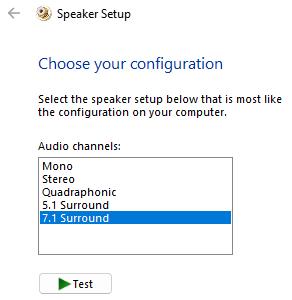
Before you get started, you need to determine which audio formats your existing hardware supports. You can check this very easily in the Windows Sound Control Panel (Control Panel > Hardware and Sound > Sound).
In the Playback tab, select your desired output and click the Configure button. You will see which surround formats (if any) are available for that output device. On my motherboard, for instance, the back panel audio is 7.1, but the front panel (the headphone jack) is only stereo.
To fix this, you need to install a program to create a virtual 7.1 output device. The Hi-Fi Cable program below does exactly this. This will make Windows think the output is a standard 7.1 surround system, when in actuality, some clever software will create a binaural audio mix of the 7.1 source material that will output to standard stereo headphones.
If your motherboard or sound card already supports 7.1 audio on your headphone jack, configure the output as 7.1 Surround and skip directly to the Equalizer APO section.
Hi-Fi Cable
If your desired output device is limited to stereo output, you will need to install the Hi-Fi Cable & ASIO Bridge program. It's donationware, so it's free to use, but you can donate some money to support the developers if you like.
Make sure to download the "Hi-Fi Cable" and not the "VB Cable" that is at the top of the page.
- Download and Install HiFiCableAsioBridgeSetup_v1007.zip
- Restart your computer if requested.
Windows Sound Control Panel
You need to configure the Hi-Fi Cable settings in the Windows Sound Control Panel (Control Panel > Hardware and Sound > Sound) to get the correct sound formats set up.
All application audio will get sent to the Hi-Fi Cable Input as a 7.1 signal. This will be processed by HeSuVi into a binaural stereo signal and sent through the Hi-Fi Cable Output to your physical stereo output (Realtek HD Audio 2nd output, in my case). All three of these need to be set to the same audio format to avoid any loss of sound quality. HeSuVi will only process audio in either 48000 Hz or 44100 Hz. Anything else will get passed through as a basic stereo mix.
Playback > Hi-Fi Cable Input
In Configure:

Firstly, you want to Configure the Hi-Fi Cable Input as the 7.1 Surround device. You will set this as the Default Device when you want to hear the surround sound through your headphones.
Select 7.1 Surround and check every box on all the following screens.
In Properties:
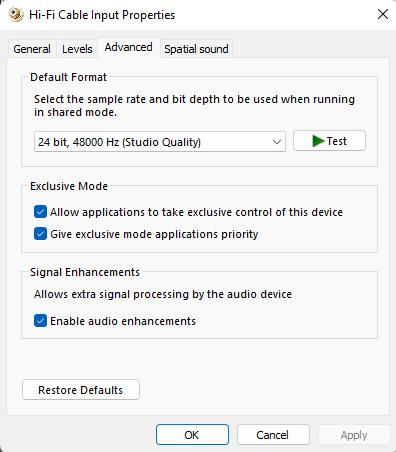
We need to set the Default format to 24 bit, 48000 Hz. While you may have higher quality options available, they won't work for surround virtualization.
| Advanced | Setting |
|---|---|
| Default Format | 24 bit, 48000 Hz |
| Allow applications to take exclusive control of this device | Checked |
| Give exclusive mode applications priority | Checked |
| Enable audio enhancements | Checked |
| Spatial Sound | |
| Spatial Sound Format | Off |
Playback > Realtek HD Audio 2nd output (or your physical output device)
In Properties:
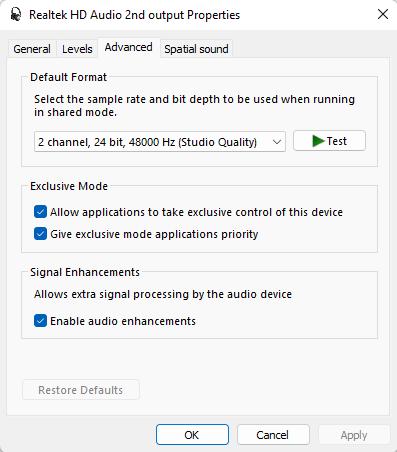
Your physical output device settings need to match the ones used for the Hi-Fi Cable Input.
| Advanced | Setting |
|---|---|
| Default Format | 2 channel, 24 bit, 48000 Hz |
| Allow applications to take exclusive control of this device | Checked |
| Give exclusive mode applications priority | Checked |
| Enable audio enhancements | Checked |
| Spatial Sound | |
| Spatial Sound Format | Off |
Recording > Hi-Fi Cable Output
In Properties:
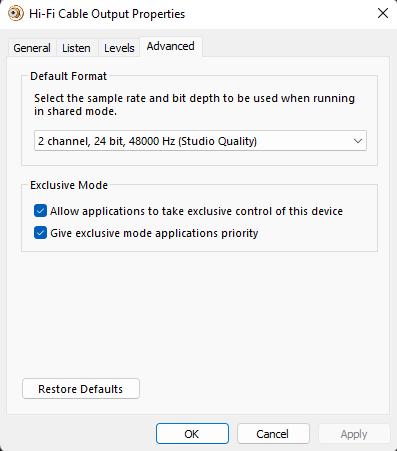
Likewise, the Hi-Fi Cable Output needs to match the settings of the Hi-Fi Cable Input.
| Listen | Setting |
|---|---|
| Listen to this device | Unchecked |
| Advanced | |
| Default Format | 2 channel, 24 bit, 48000 Hz |
| Allow applications to take exclusive control of this device | Checked |
| Give exclusive mode applications priority | Checked |
| Enable audio enhancements | Checked |
ASIO Bridge
Run the program ASIO Bridge that was installed with the Hi-Fi Cable. The ASIO Bridge connects the Hi-Fi Cable audio to the physical device. ASIO Bridge appears in the system tray. Double-click on that to bring up the configuration window.
Click the main button so that it says ASIO ON. An important thing to remember is that if you ever want to use the physical headphone output as normal, you need to turn the ASIO OFF.
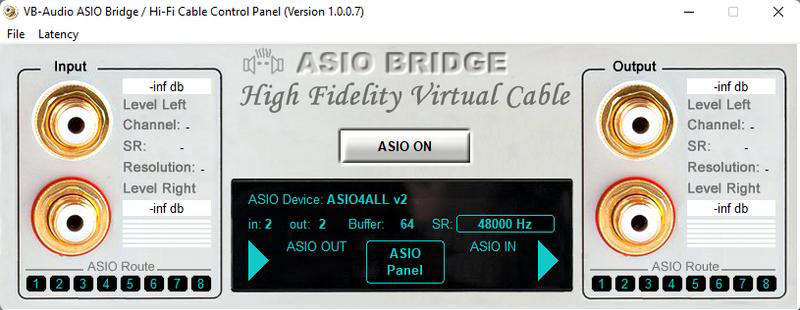
| Setting | Value |
|---|---|
| File Menu > System Tray (Run at Startup) | Checked |
| Latency Menu | Max Latency: 1536 smp |
| ASIO Device | ASIO4ALL v2 |
To set the ASIO Device, just click on its name to bring up a selection menu.
Click on "ASIO Panel" to bring up the ASIO4ALL Configuration Utility.
In ASIO4ALL:
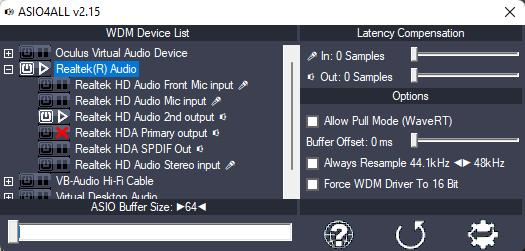
This is where you configure the physical output device to connect to the Hi-Fi Cable Output. The options set here get rid of any extra latency in the audio system.
Click the Gear icon to enable Advanced Options.
Enable Realtek(R) Audio > Realtek HD Audio 2nd output (or your physical output device.)
| Setting | Value |
|---|---|
| In | 0 Samples |
| Out | 0 Samples |
| Allow Pull Mode (WaveRT) | Unchecked |
| Buffer Offset | 0 ms |
| Always Resample | Unchecked |
| Force WDM Driver To 16 Bit | Unchecked |
| ASIO Buffer Size | 64 |
Volume2
When you are using Hi-Fi Cable, you won't be able to change the volume as normal. The physical output device still controls the volume, but Windows will try to change the volume of the Hi-Fi Cable Input instead, which will have no effect.
Volume2 is a free program that lets you change the volume of a different audio device, no matter which is active.
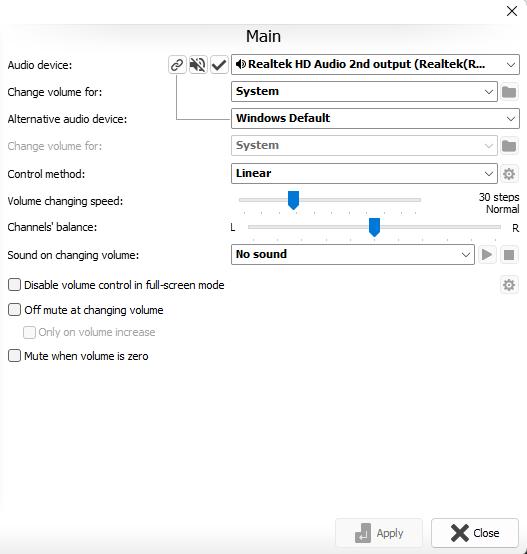
- Download and Install Volume2
| Setting | Value |
|---|---|
| Audio Device | Realtek HD Audio 2nd output (or your physical output device) |
| Change Volume for | System |
| Alternative Audio Device | Windows Default |
With Volume2 running, changing the volume will change the Realtek HD Audio 2nd output's volume. When you are not using headphones, make sure to exit Volume2, or you will not be able to change the volume of any other device.
Equalizer APO
Now that you have a working 7.1 Surround audio device, in the form of the Hi-Fi Cable or a sound card that natively supports it, it is time to install the software that can convert the 7.1 audio signal into a binaural stereo mix suitable for stereo headphones. Equalizer APO and the HeSuVi plugin (both completely free) will handle this.
- Download and install Equalizer APO.
- Restart your computer if requested.
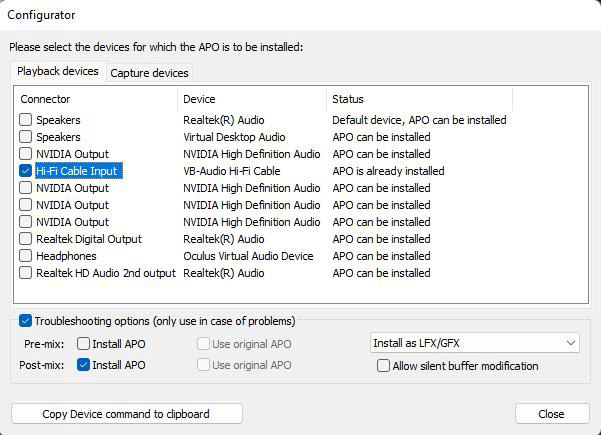
Run the Equalizer APO Configurator. It is in the Equalizer APO folder in the Start menu. It may also open automatically when you first install.
You have to tell Equalizer APO to process the audio of the Hi-Fi Cable Input and where it should run in the signal chain.
| Setting | Value |
|---|---|
| Hi-Fi Cable Input | Checked |
| Troubleshooting options | Checked |
| Pre-mix | Unchecked |
| Post-mix | Checked |
| Install as LFX/GFX | |
| Allow silent buffer modification | Unchecked |
If the surround virtualization doesn't work at anytime in the future, come back to this Configurator and try different combinations of the Pre-mix and Post-mix settings. I have had this option reset, maybe because of a Windows Update, and have had to turn off the Pre-mix to get the virtualization working again.
HeSuVi
The HeSuVi plugin provides the interface to control the surround virtualization. This lets you choose what kind of virtualization to use as well as the relative volume and equalization.
- Download and Install HeSuVi.
- Restart your computer if requested.
In Equalizer:
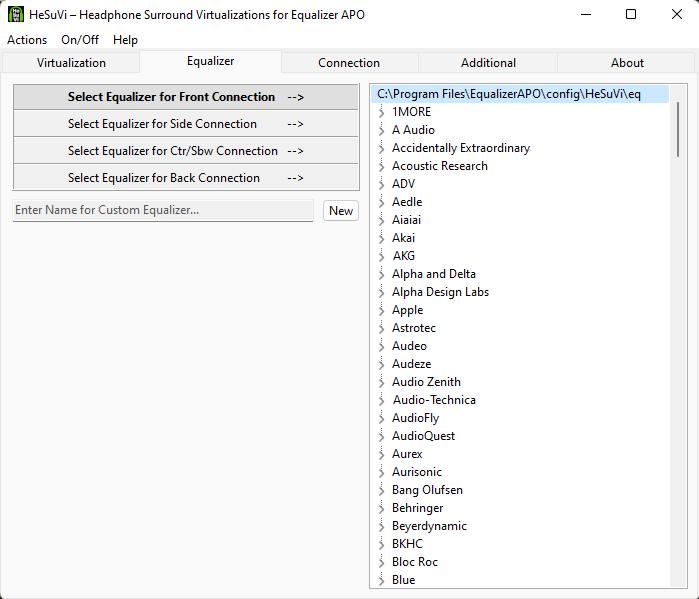
While not strictly required, it's highly recommended setting the Equalizer to your headphone model. There are hundreds of presets, so you will undoubtedly find it in the list.
These equalize the frequencies to a totally flat response. This is particularly important for the binaural effect to work properly.
Choose the Equalizer preset for the Front Connection.
In Connection:
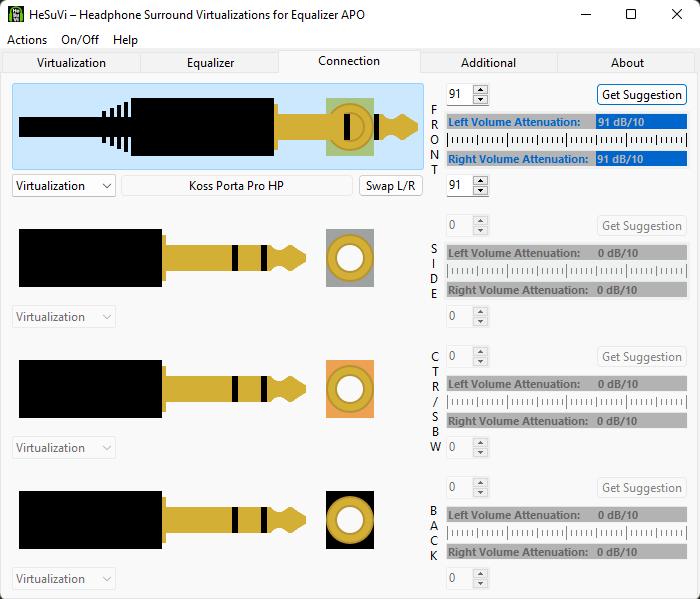
Enable the top connection (the Front Connection) and set the drop-down box underneath to Virtualization. The button with the name of the Equalizer preset you chose toggles turning the equalizer on or off.
At least on Windows 11, it is difficult to see if the equalizer is on or not. The faded gray background means it is enabled. The lighter background means it is disabled.
The same applies for the "Swap L/R" button, which simply swaps the left and right channels.
With the equalizer on, click the "Get Suggestion" button to automatically set the volume attenuation.
In Virtualization:
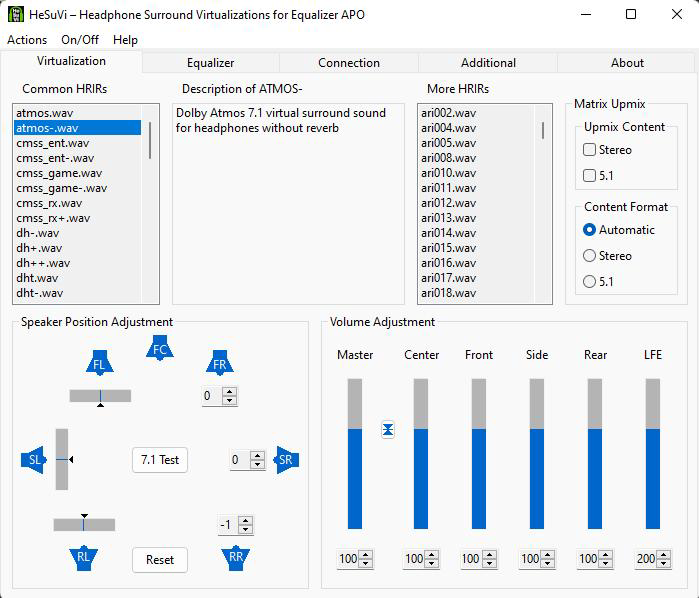
The Virtualization tab has a lot of options that you need to play with, as the best options will depend on your personal preferences.
Click on the 7.1 Test button to open a file that tests each channel individually. I recommend putting this on repeat while you try out all the other settings.
Most importantly, you should try out all the Common HRIRs. I use the atmos-.wav, but what works best for you will depend on your own personal setup.
At the bottom of the window, you can control the volume for each channel as well as the positioning of the virtual speakers. You can control the width of the front and rear speakers and how forward or backward the side channels are.
Daily Usage
It's complicated getting everything set up properly, but it's actual simple to use in normal, daily use.
When you want to listen to 7.1 virtual surround sound:
- Make "Hi-Fi Cable Input" the active sound output device.
- Make sure ASIO is ON in ASIO Bridge.
- Run Volume2 to be able to change the volume.
When you want to use your speakers:
- Make your speakers the active sound output device.
- Exit Volume2 to be able to change the volume.
If you want to use the physical device output without 7.1 virtualization, but keep the equalization:
- Make "Hi-Fi Cable Input" the active sound output device.
- Make sure ASIO is ON in ASIO Bridge.
- Run Volume2 to be able to change the volume.
- Change the HeSuVi Connection from "Virtualization" to "Stereo Mix."
If you want to use the physical device output without 7.1 virtualization or equalization:
- Make sure ASIO is OFF in ASIO Bridge. Do this first.
- Make "Realtek HD Audio 2nd output" (or your physical device output) the active sound output device.
- Volume2 can be open or closed, either way the volume still changes.
Troubleshooting
Windows Updates can break some things. You may need to reinstall Hi-Fi Cable and fix the settings in the Equalizer APO Configurator if the virtualization doesn't work after an update.
If the 7.1 virtualization isn't working, try changing the Pre-mix and Post-mix settings in the Equalizer APO Configurator. Make sure the HeSuVi Connection is set to "Virtualization."
Conclusion
I know this seems like a lot of work, but it's worth it. The binaural sound works amazingly well. I've especially enjoyed listening to 5.1 album mixes this way. While it's obviously not as impressive as a real surround sound speaker setup, it's a great alternative if that just isn't an option.
Let me know if you have any comments or questions.