JavaScript Game Tutorial - Space Invaders Part 7 - 3D Renderer
This is the seventh part in a series about creating a Space Invaders clone in JavaScript. It is highly recommended to start from the beginning as each part builds directly upon the previous.
| Space Invaders Tutorial Series | |
|---|---|
| Part 0 | Beginner JavaScript Game Tutorial For Professional Use |
| Part 1 | Math Classes and Game Entity Structure |
| Part 2 | User Input |
| Part 3 | Enemy Behavior |
| Part 4 | Collision Detection and Projectiles |
| Part 5 | Sprites and User Interface |
| Part 6 | Optimization |
| Part 7 | 3D Renderer |
| Part 8 | Events and Audio |
Introduction
In Part 6, we optimized the memory usage to improve performance by limiting the impact of the garbage collector. This was a very behind-the-scenes modification that had no visual impact to the game at all. In this part, we are doing the exact opposite and making a drastic change to the visuals by creating a 3D Renderer.
Thanks to the fundamental modular design set in Part 0, we can easily swap out the 2D renderer for a 3D renderer with only a slight change to any other part of the code.
We will be using Three.js as the 3D graphics library. If you are not already familiar with using Three.js, I have written a getting started tutorial that teaches everything you need to know for what we will be doing today.
As in the getting started tutorial, we need to include the three.js and GLTFLoader.js files in the HTML.
<script src="js/three.js"></script>
<script src="js/loaders/GLTFLoader.js"></script>
Goals
The goals for this part are:
- Add a 3D renderer object using Three.js.
- Minor updates to the Game object to use the 3D renderer.
Renderer (2D)
The UI portion of the renderer doesn't change at all. For the sake of brevity in this tutorial, I will just expose the updateUI() function from the existing 2D renderer and call it from the 3D renderer. You could also move the UI code into the 3D renderer directly, which would allow creating the UI in 3D, for instance.
return {
    render: _render,
    updateUI: _updateUI
};
Blender
As in the Three.js Getting Started Tutorial, we will load all the 3D game assets from a GLTF file that you can download here. In the Blender file there is a 3D Mesh for each of the different Game Entities as well as the scenery to display. These act the same way as Sprites do in the 2D renderer.
Additionally, there is a hidden mesh called the GameFieldMesh. This defines the origin of where the Game Entities will be placed in the 3D scene. As Entities are created, their corresponding Meshes will be added as children of the GameFieldMesh.
As of this writing, lights don't export from Blender using GLTF, as the exporter is still under active development. So, for this project, we will be hard coding the lights. It's not ideal, but it won't be long before this is a non-issue.
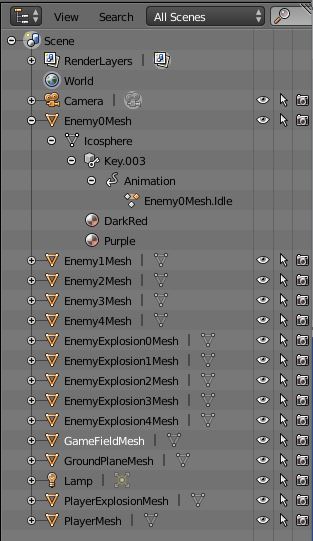
The Blender scene I created for this demonstration has every Mesh and Animation named so they can be easily referenced by name in the code. Every mesh is named in the format "<Object>Mesh" and the animations associated with it named in the format "<Object>Mesh.<Animation>". For instance, the Enemy of rank 0 has a Mesh named "Enemy0Mesh" with an idle animation named "Enemy0Mesh.Idle".
Renderer3D
The 3D renderer acts as the glue between our game code and the Three.js scene graph. It translates the state changes from the Game Entities into Mesh updates. For that reason, most of the code is simply loading and keeping track of the 3D assets.
The render loop is very simple. All it has to do is go through the entities and update the position of the corresponding mesh and handle the animation. One of the things we have to deal with is the translation of coordinate systems. In the game logic, (0, 0) is the upper left of the screen. In 3D, (0, 0, 0) is the center of the world, making y=0 the ground plane. We have to handle that discrepancy when we update the Mesh positions.
To make the connection between the Game Entities and the Three.js Meshes, we have to create public addEntity() and removeEntity() functions. These will be called by the game object when new Entities are created or destroyed. These functions maintain the entityMeshMap data structure that will be used the Mesh objects with the updated information every frame.
It is important to add the 3D renderer above the 2D renderer, otherwise it won't be able to get the drawing context.
| Renderer3D | ||
|---|---|---|
| Property | Type | Description |
| _glRenderer | THREE.WebGLRenderer | the Three.js renderer for a WebGL context |
| _scene | THREE.Object3D | the entire Three.js scene graph |
| _gltf | Object | the GLTF import |
| _animationMixers | Array | an array of animations that can be reference by name |
| _playerMesh | THREE.Mesh | the mesh for the Player entity |
| _playerExplosionMesh | THREE.Mesh | the mesh for the PlayerExplosion entity |
| _enemyMeshes | Array | the meshes for the different ranks of Enemy entities |
| _enemyExplosionMeshes | Array | the meshes for the different ranks of EnemyExplosion entities |
| _entityMeshMap | Object | a map of Entity's to the corresponding Mesh |
| _projectileColors | Object | the colors for the two types of projectiles |
| _enemyIdleAnimations | Array | the names of the idle animations for the different ranks of Enemy entities |
| Function | Return Type | Description |
| _getAnimation( name ) | THREE.AnimationMixer | returns the AnimationMixer with name. undefined if it doesn't exist |
| _addEntity( entity ) | none | create a Mesh for the entity and store an Entity-Mesh pair for later use |
| _removeEntity( entity ) | none | removes the Entity-Mesh pair with the given entity |
| _loadedGLTF( gltf ) | none | callback for the GLTF loader on successful loading |
| _init() | none | initialize the scene and load the GLTF file |
| _getMeshFromEntity( entity ) | THREE.Mesh | returns the Mesh from the Entity-Mesh pair with entity |
| _render( dt ) | none | render the scene |
//
// Renderer3D
//
var renderer3d = (function () {

    var _glRenderer,
        _scene,
        _gltf,
        _animationMixers = [],
        _playerMesh,
        _playerExplosionMesh,
        _enemyMeshes = [],
        _enemyExplosionMeshes = [],
        _entityMeshMap = [];

    var _projectileColors = { "player": "#C4D06A",
                               "enemy": "#60c360" };

    var _enemyIdleAnimations = ["Enemy0Mesh.Idle",
                                "Enemy1Mesh.Idle",
                                "Enemy2Mesh.Idle",
                                "Enemy3Mesh.Idle",
                                "Enemy4Mesh.Idle"];

    //
    // Gets the animation from the loaded GLTF file with name.
    //
    function _getAnimation(name) {
        var anim = _gltf.animations.find(function (value) {
            return value.name === name;
        });

        return anim;
    }

    //
    // Add an Entity-Mesh pair for the entity.
    //
    function _addEntity(entity) {

        var geometry, material, mesh, animation;

        if (entity instanceof Player) {
            mesh = _playerMesh.clone();
        }

        else if (entity instanceof PlayerExplosion) {
            mesh = _playerExplosionMesh.clone();
            animation = _getAnimation('PlayerExplosionMesh.Idle');
        }

        else if (entity instanceof Enemy) {
            mesh = _enemyMeshes[entity.rank].clone();
            animation = _getAnimation(_enemyIdleAnimations[entity.rank]);
        }
        else if (entity instanceof Explosion) {
            mesh = _enemyExplosionMeshes[entity.rank].clone();
        }

        else if (entity instanceof Projectile) {
            geometry = new THREE.BoxBufferGeometry(entity.width, entity.height, 1);
            material = new THREE.MeshStandardMaterial({ color: _projectileColors[entity.type] });
            mesh = new THREE.Mesh(geometry, material);
            mesh.castShadow = true;
        }

        // Default Geometry
        else {
            geometry = new THREE.BoxBufferGeometry(entity.width, entity.height, 1);
            material = new THREE.MeshStandardMaterial({ color: 'red' });
            mesh = new THREE.Mesh(geometry, material);
            mesh.castShadow = true;
        }

        // If there is an animation, create an AnimationMixer for it
        if (animation) {
            var mixer = new THREE.AnimationMixer(mesh);
            mixer.clipAction(animation).setDuration(1).play();

            _animationMixers.push(mixer);
        }

        // Add the mesh to the scene
        _gameFieldMesh.add(mesh);

        // Create an Entity-Mesh pair
        _entityMeshMap.push({ entity: entity, mesh: mesh });
    }

    //
    // Remove the Entity-Mesh pair associated with the entity.
    //
    function _removeEntity(entity) {
        for (var i = _entityMeshMap.length - 1; i >= 0; i--) {
            if (_entityMeshMap[i].entity === entity) {
                _gameFieldMesh.remove(_entityMeshMap[i].mesh);
                _entityMeshMap.slice(i, 1);
                break;
            }
        }
    }

    //
    // Load the GLTF assets and finish creating the scene.
    //
    function _loadedGLTF(gltf) {
        var divWidth = _glRenderer.domElement.offsetWidth;
        var divHeight = _glRenderer.domElement.offsetHeight;

        _gltf = gltf;

        // Add the scene and set everything to have shadows.
        _scene.add(_gltf.scene);
        _gltf.scene.traverse(function (child) {
            if (child instanceof THREE.Mesh) {
                child.castShadow = true;
                child.receiveShadow = true;
            }
        });

        // Load Camera, update its aspect ratio
        _camera = gltf.cameras[0];
        _camera.aspect = divWidth / divHeight;
        _camera.updateProjectionMatrix();

        // GameField Mesh
        _gameFieldMesh = _gltf.scene.getObjectByName('GameFieldMesh');

        // Player Mesh
        _playerMesh = _gltf.scene.getObjectByName('PlayerMesh');
        _playerExplosionMesh = _gltf.scene.getObjectByName('PlayerExplosionMesh');

        // Enemy Meshes
        _enemyMeshes[0] = _gltf.scene.getObjectByName('Enemy0Mesh');
        _enemyMeshes[1] = _gltf.scene.getObjectByName('Enemy1Mesh');
        _enemyMeshes[2] = _gltf.scene.getObjectByName('Enemy2Mesh');
        _enemyMeshes[3] = _gltf.scene.getObjectByName('Enemy3Mesh');
        _enemyMeshes[4] = _gltf.scene.getObjectByName('Enemy4Mesh');

        // Enemy Explosion Meshes
        _enemyExplosionMeshes[0] = _gltf.scene.getObjectByName('EnemyExplosion0Mesh');
        _enemyExplosionMeshes[1] = _gltf.scene.getObjectByName('EnemyExplosion1Mesh');
        _enemyExplosionMeshes[2] = _gltf.scene.getObjectByName('EnemyExplosion2Mesh');
        _enemyExplosionMeshes[3] = _gltf.scene.getObjectByName('EnemyExplosion3Mesh');
        _enemyExplosionMeshes[4] = _gltf.scene.getObjectByName('EnemyExplosion4Mesh');

        // Create the lighting
        var aLight = new THREE.AmbientLight(0x555555);
        _scene.add(aLight);

        var lightTarget = new THREE.Object3D();
        lightTarget.position.set(0, 0, -200);
        _scene.add(lightTarget);

        var light = new THREE.SpotLight(0xffffff, 1, 500, Math.PI / 3, 0.1, 2);
        light.position.set(0, 100, 30);
        light.target = lightTarget;
        light.power = 10;
        light.castShadow = true;
        light.shadow.mapSize.width = 1024;
        light.shadow.mapSize.height = 1024;
        _scene.add(light);
    }

    //
    // Initialize the renderer. Loads all the 3D assets.
    //
    function _init() {
        var canvas = document.getElementById('game-layer');

        // Create a scene
        _scene = new THREE.Scene();
        _scene.background = new THREE.Color(0x000000);
        _scene.fog = new THREE.FogExp2(0x000000, 0.0005);

        // Setup WebGLRenderer
        _glRenderer = new THREE.WebGLRenderer({ canvas: canvas, antialias: true });
        _glRenderer.setPixelRatio(window.devicePixelRatio);
        _glRenderer.shadowMap.enabled = true;
        _glRenderer.shadowMap.type = THREE.PCFSoftShadowMap;

        // Load the GLTF file
        var loader = new THREE.GLTFLoader();
        loader.load('assets/models/invaders3d.glb',
                        _loadedGLTF,   // Success
                        undefined,     // Progress
                        function (e) { // Error
                            console.error(e);
                        } );
    }

    //
    // Return the Mesh associated with the entity. Returns undefined if no mesh is found.
    //
    function _getMeshFromEntity(entity) {
        for (var i = _entityMeshMap.length - 1; i >= 0; i--) {
            if (_entityMeshMap[i].entity === entity) {
                return _entityMeshMap[i].mesh;
            }
        }

        return undefined;
    }

    //
    // Update the scenegraph and render the current frame.
    //
    function _render(dt) {
        var i, entity, entities = game.entities();

        // Update Meshes for Entities
        for (i = entities.length - 1; i >= 0; i--) {
            entity = entities[i];
            entity.time += dt;

            var mesh = _getMeshFromEntity(entity);
            if (mesh) {
                // Account for the change in coordinate system.
                mesh.position.set(entity.position.x,
                                  -entity.position.y + game.gameFieldRect().height,
                                  0);
            }
        }

        // Call to the original renderer to still handle UI updates.
        renderer.updateUI();

        // Update any animations
        for (i = _animationMixers.length - 1; i >= 0; i--) {
            _animationMixers[i].update(dt);
        }

        // Render the 3D scene
        _glRenderer.render(_scene, _camera);
    }

    // Initialize the renderer
    _init();

    return {
        addEntity: _addEntity,
        removeEntity: _removeEntity,
        render: _render
    };
})();
Game
As mentioned above, the Game object has to be updated to address the renderer3d object. Any time an Entity is created or destroyed, renderer3d.addEntity() or renderer3d.removeEntity() is called, this includes when the start() function is called. And, of course, we have to call renderer3d.render() in the update() function.
function _addEntity(entity) {

    // Update the 3D renderer.
    renderer3d.addEntity(entity);

    ...
}

function _removeEntities(entities) {
    if( !entities ) return;

    // Update the 3D renderer.
    for( var i=entities.length-1; i>=0; i--) {
        renderer3d.removeEntity(entities[i]);
    }

    ...
}

// Don't forget to call _removeEntities before clearing _entities in _start().
function _start() {

    _removeEntities(_entities);

    _lastFrameTime = 0;
    _entities = [];

    ...
}

// Lastly, we need to update the render call in _update().
function _update(time) {

    ...

    // Render the frame
    //renderer.render(dt);
    renderer3d.render(dt);

    ...
}
How To Play
Move: Arrow Keys / Tap Sides
Shoot: Spacebar / Tap Middle
| High Scores | |
|---|---|
| 1. | 0 |
| 2. | 0 |
| 3. | 0 |
| 4. | 0 |
| 5. | 0 |
| 6. | 0 |
| 7. | 0 |
| 8. | 0 |
| 9. | 0 |
| 10. | 0 |
Conclusion
I hope this exercise has demonstrated how important it is to have a modular design of even a small game engine like this. Without it, a change this large would have been a nightmare. But having set up that solid foundation, it is very easy to change and grow this engine as your needs advance.
Switching from a 2D renderer to a 3D renderer in a 2D game is fairly trivial on a programming level. The complexity is in the asset creation. Creating full 3D gameplay adds a significant amount of complexity to the core gameplay code. Collisions, physics and AI all become more complicated.
If you want to go further into 3D programming, you may want to see my guide on Web 3D Graphics Programming for Beginners, which is basically a list of things you need to learn to get into serious 3D programming.
These books by David H. Eberly are extremely detailed textbooks on every aspect of 3D engines. If you really want to become an expert, I highly recommend you pick these up.
In the next part:
- Part 8. Add an Event System and Audio.
I have packaged the code for the full tutorial series for anyone interested in downloading it.