Best BeamNG.drive Settings for Thrustmaster TMX / T150
BeamNG.drive is a unique physics-based driving simulator. Every part of the car is realistically simulated, giving it not only the most intricate damage modeling I have ever seen, but also a tremendous amount of variety in the vehicles available. There are road cars, race cars, pickup trucks, buses and everything in between. One mission involves delivering a stack of mattresses to a location without any falling off the car or the hitched trailer. No other simulator that I know of is doing anything like this.
As an Early Access title, it's still very much in development. While the base simulation continues to improve, the actual gameplay elements are still fairly limited. The recent 0.24 update added a bunch of new gameplay features as well as a revamped force feedback system including a soft lock.
The new force feedback works very well with the Thrustmaster TMX and T150. Since it is completely physics-driven, there aren't actually many settings to configure. It does support using a LUT, exactly as used by Assetto Corsa, which really benefits these wheels in particular.
In this guide, I will show how to calibrate the wheel to make a LUT file, as well as look at the best settings to use in-game for the force feedback.
Wheel Calibration
A LUT (Look Up Table) is a file created by a wheel calibration tool. A series of tests is run that sends a certain force to the wheel and measures how far the wheel actually moves. This data gets recorded in a LUT file. A simulator like BeamNG.drive or Assetto Corsa can use that data to send a calibrated force to the wheel to make it move the intended amount based on the physics simulation. Without the LUT, most forces will either be too strong or too weak, depending on the wheel mechanism and not accurate to the simulation.
Reuse Existing LUT File
If you have already created a LUT for Assetto Corsa, you can easily use that file for BeamNG.drive. Simply copy the LUT file from:
Documents\Assetto Corsa\cfg
to:
AppData\Local\BeamNG.drive\[version]\settings\inputmaps\wheel.lut
It is important to rename the file to "wheel.lut". Any other file name will be ignored. The AppData folder is hidden in your user folder. You can show hidden items in the File Explorer > View menu, or type it directly in the address bar.
Now you can skip to the Thrustmaster Control Panel Settings.
Create New LUT File
Downloads
You will need to download two programs to create a LUT file:
- WheelCheck is an application that tests your wheel's force feedback response.
- LUT Generator for AC converts the data from WheelCheck into a LUT file that BeamNG.drive or Assetto Corsa can use. You will need to sign up for a free account on Race Department to download this. On the Register page, scroll all the way down to the bottom to create a free Basic Account.
Wheel Check

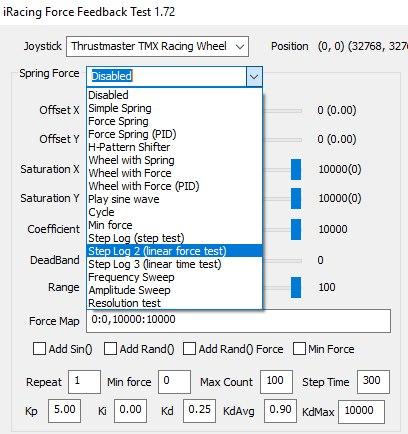
Wheel Check is a tool from iRacing that calibrates your individual wheel. It's a very simple process:
- Run WheelCheck.
- Set the Max Count to 100.
- In Spring Force, select "Step Log 2 (linear force test)". This starts the calibration process.
Your wheel will start moving in increasingly larger motions. Don't touch the wheel during this process! This process compares the amount of force the computer sends to the wheel to how much the wheel actually moves.
Once it finishes, it creates a file called something like "log2 2021-04-29 22-04-08.csv" in your Documents folder. We will give this file to LUTGenerator in the next step.
LUT Generator

Run LUTGenerator and open the csv file that was just created by WheelCheck. This will create a LUT file that BeamNG.drive can use to calibrate the force feedback. Save this file to:
AppData\Local\BeamNG.drive\[version]\settings\inputmaps\wheel.lut.
It is important to rename the file to "wheel.lut". Any other file name will be ignored. The AppData folder is hidden in your user folder. You can show hidden items in the File Explorer > View menu, or type it directly in the address bar.
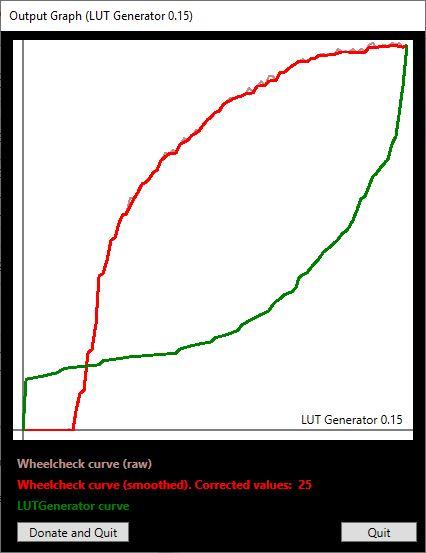
LUTGenerator displays a graph that shows the raw data in red and the new curve in green. You can see how the green curve compensates for the red to create an ideal linear response.
Thrustmaster Control Panel Settings
BeamNG.drive automatically sets the proper steering angle for each car in the game, so you can leave the Thrustmaster Control Panel set to the maximum.
| Setting | Value |
|---|---|
| Rotation | 900° (TMX) 1080° (T150) |
| Overall Strength of all forces | 100% |
| Constant | 100% |
| Periodic | 100% |
| Spring | 100% |
| Damper | 100% |
| BOOST | Off |
| Auto-Center | by the game |
Spring and Damper are not used by BeamNG.drive, so can be set to any value without issue. As a general rule, I leave these at 100% since there are some games that require them.
BOOST should always be turned off. For an in-depth look as to why, see my BOOST Force Feedback Analysis.
BeamNG.drive Settings
In Options > Controls > Bindings > Vehicle:
I needed to manually bind all the controls for the pedals and steering. I'm not sure if that is typical, or just a bug I ran into, but it was just a one-time setup, so not that big of a deal.
I highly recommend binding keys for "Temporarily increase/decrease FFB strength", as this will need to be adjusted for most cars.
Binding "Temporarily increase/decrease FFB smoothing" can also be useful, though I haven't had to use it nearly as much.
In Options > Controls > Force Feedback:
| Setting | Value |
|---|---|
| Filter | Wheel (direct) |
| 1:1 Steering Angle | 900° (TMX) 1080° (T150) |
| 1:1 Behaviour | Faster If Needed |
| Inverted Axis | Unchecked |
| Linearity | 1 |
| Deadzone (rest) | 0 |
| Deadzone (end) | 0 |
These settings just set up the basic properties of the wheel.
1:1 Behaviour determines how the wheel will map to cars with steering rotations larger than the wheel's maximum. The "Faster If Needed" mode will use a normal 1:1 steering during the first half of the wheel's rotation. In the latter half of the rotation, it will scale the input as much as is necessary to reach the full lock of the in-game vehicle. This can take some getting used to, but it works very well and is preferable to scaling the entire rotation to fit the wheel.
Force Feedback Configuration:
| Setting | Value |
|---|---|
| Enabled | Checked |
| Inverted | Unchecked |
| Strength | 350 default, 200-450 based on car |
| Steering Lock Strength | 100% |
| Side Acceleration Strength | 0% normally, 10% on track |
| Reduce Strength While Parked | Checked |
| Smoothing | 80 |
| Automatic Secondary Smoothing | Checked |
| Update Rate Limit | Automatic |
| Update Type | Fast |
| Use Response Correction Curve | Checked |
Enabled simply enables or disables the force feedback.
Inverted should be left unchecked for these wheels.
Strength controls the overall strength of the forces. 350 is a good starting point for any car, but this will need to be adjusted depending on the vehicle you are driving. Some have a much heavier feel than others, so there is no way to have one setting that works perfectly for everything. 200 is as light as I have needed and can be useful for very high downforce cars or rally stages where there are a lot of heavy bumps. 450 is the strongest I found necessary for vehicles with very light force feedback like vans, for instance.
Steering Lock Strength enables the soft lock for any vehicle that has a steering rotation less than the wheel's maximum, preventing the wheel from turning past the steering angle of the car in-game.
Side Acceleration Strength applies some information about the lateral g-forces to the force feedback. I leave this at 0% most of the time. When going off-road or doing anything with slower vehicles, this isn't necessary. When doing more traditional racing on a track, I set this to 10%. I find it helps to feel more of the weight of the car in corners. With this at 0%, you strictly feel the traction of the tires, with the wheel going light when you enter understeer or oversteer. In a high speed corner, it can feel a little odd to only feel the tire grip if you are used to other simulators that include g-forces as part of the force feedback.
Reduce Strength While Parked lowers the force feedback strength when the car is stopped, so you don't get overwhelmed with the engine vibration.
Smoothing effectively controls the amount of vibrations you will feel. The lower this value, the more detail you will feel. Larger values smooth out these fine details. Lowering this too much will make the bumps overly aggressive. I haven't found this needs to be adjusted much between vehicles, but the option is available.
Update Rate Limit will control the frequency the game sends data to the wheel. This is best left at Automatic.
Update Type controls the type of data sent to wheel. It should be set to Fast for these wheels.
Use Response Correction Curve will enable the LUT file to be used. You will see the graph appear for the wheel.lut file that we added earlier. You need to click the Apply button for it to appear the first time.
Conclusion
BeamNG.drive is unique amongst all the other racing simulators out there. The physics are very impressive, even if it still feels rather basic gameplay-wise. I'm greatly looking forward to the eventual full release with the direction the game is going. It will be a truly unique game.
Let me know if you have any questions or comments.
